Are you ready to take your cat drawing skills to the next level? Look no further because we’ve got the ultimate guide on how to draw cat ears. Whether you’re an artist or just starting out, knowing how to draw cat ears is a must-have skill.
Why focus on cat ears specifically, you ask? Not only do they add an extra dose of cuteness to any feline drawing, but they can also convey a range of emotions and expressions. From perky and playful to relaxed and sleepy, cat ears can tell a story all on their own.
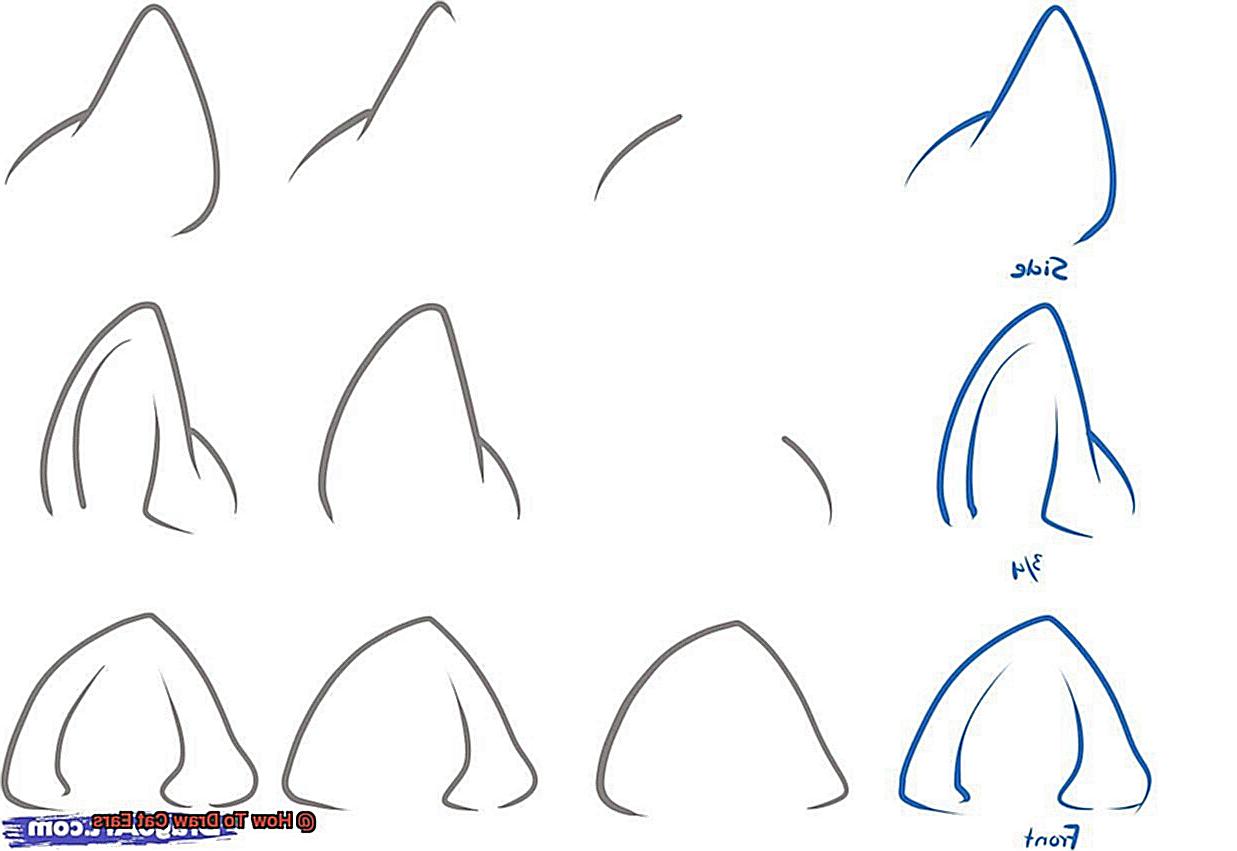
In this article, we’ll take you through the step-by-step process of drawing cat ears. We’ll cover everything from basic techniques to adding those final touches that bring your artwork to life. Plus, we’ll explore the different types of cat ears and what makes them unique.
Whether you’re interested in creating realistic or anime-style cat ears, we’ve got all the tips and tricks you need. So grab your pencils and let’s get started on creating the perfect ears for your feline character.
Gather the Necessary Materials
Drawing cat ears can be a delightful and imaginative pursuit that allows you to tap into your artistic side. Regardless of your level of expertise in drawing, the first step towards creating beautiful cat ears is to gather all the necessary materials.
To start with, you will need a good quality pencil or pen. A mechanical pencil with a fine lead or a traditional wooden pencil with an HB or B grade lead is perfect for sketching out your cat ear designs. Alternatively, you can opt for fine-tipped markers or gel pens if you prefer to work with ink.
Next, you will need paper to draw on. It is recommended to use heavier weight paper such as bristol board or drawing paper to prevent wrinkling or tearing while you draw.
An eraser is also an indispensable tool for any drawing project. A kneaded eraser is ideal for drawing since it can be molded into any shape and does not leave any residue on the paper. It comes in handy when erasing small details or fixing mistakes.
Additionally, having reference images of cat ears on hand can be incredibly useful in ensuring accuracy in your drawings. You can find images online, in books, or by observing your own cat’s ears. These references will help you create realistic and detailed cat ears that are sure to impress.
When drawing cat ears, it is important to pay attention to the details. Cat ears have a triangular shape with a slightly curved bottom edge and are positioned on the top of the head, angled slightly outward. The size and shape of the ear can vary depending on the breed of cat.
To begin your drawing, sketch out a triangle with a curved bottom edge and then add fur texture or tufts if desired. Adding shading will give your drawing more depth and realism. Remember to make sure both ears are symmetrical and positioned correctly on the head.
Pay Attention to Details
Whether it’s drawing cat ears or any other aspect of art, the smallest details can make a huge difference. Let’s take a closer look at why paying attention to details is so crucial when it comes to drawing cat ears.
First and foremost, cat ears come in all shapes and sizes, depending on the breed. For instance, Siamese cats have larger ears with pointed tips while Persian cats have shorter, more rounded ears. To create a realistic and accurate depiction of your feline subject’s unique features, you need to pay close attention to these small but significant differences.
Proportions are another essential factor to consider when drawing cat ears. You want your artwork to be visually appealing, so you need to make sure that the size of the ears is proportional to the cat’s head and body. Getting this wrong can make your artwork look cartoonish or just plain odd.
Perspective is also critical when it comes to drawing cat ears. Depending on the angle you’re drawing from, the ears will appear different. For example, if you’re drawing a side view of a cat, its ears will appear flatter than if you’re drawing a front view. This detail may seem small, but it can make all the difference in elevating your artwork.
Finally, don’t forget about the fur on the ears. Some breeds have tufts of fur on their ear tips or inside their ears, which can add an extra layer of realism to your artwork. By taking note of these details, you can create a masterpiece that captures the essence and uniqueness of each feline subject.
Start by Drawing a Triangle
Let’s start with the basics – a simple triangle shape. This shape serves as the foundation for drawing cat ears and paves the way for more intricate details later on.
But before you start sketching, take some time to research and observe your cat’s breed. Different breeds have distinct ear shapes and sizes. By noting these details, you can ensure that your drawing is accurate and true to life.
Now, let’s talk about the triangle shape. The top should be pointed, while the base is the widest part of the triangle. This basic structure sets the stage for adding in more details like the inner ear and fur texture.
When drawing the inner ear, keep in mind that it can be represented by a smaller triangle shape within the larger triangle. As for fur texture, small lines or strokes along the edges of the ear can do wonders.
But don’t forget about the angle and positioning of the ears. Cats are known for moving their ears in different directions depending on their mood. By observing your cat’s ear movements, you can get a better sense of how to position them in your drawing.
The key to creating a masterpiece lies in the details. Pay attention to breed-specific shapes and sizes, proportions, perspective, and even fur. All of these elements add depth and realism to your drawing.
Add Details for Realism

As an expert in adding details for realism, I have some tips and tricks that will help bring your feline masterpiece to life.
Firstly, let’s talk about the importance of shape and placement. Cat ears are typically triangular in shape, with the base at the head and the tip pointing upwards. However, the angle and positioning of the ears can convey different moods and emotions – flattened against the head can indicate fear or aggression, while perked up can show interest or curiosity. So, take a moment to consider what mood or emotion you want to convey through your drawing.
Next, let’s delve into fur texture. Depending on the breed of cat, the fur on their ears can vary greatly – from short and smooth to long and textured. Paying attention to these small details can really make your drawing stand out and add depth to the image.
But we’re not done yet. Adding shading and highlights is also important in creating a realistic image. Shadows can be added in areas where the ear overlaps with other parts of the head or face, while highlights can be added to areas where light would naturally hit – such as the tips of the ears. These subtle additions can really elevate your drawing.
And let’s not forget about small details – ear tufts or inner ear coloring can add character and personality to your drawing. These seemingly insignificant details can make a big difference in bringing your drawing to life.
Make Sure the Ears are Symmetrical
Creating a realistic drawing of a cat can be challenging, but achieving symmetry in the ears is crucial in achieving a professional look. Symmetry means that both ears should be of equal size and shape and positioned at the same angle. If you’re struggling with getting those ears just right, don’t worry – we’ve got some expert tips to help you out.
To start, draw guidelines to help you keep the ears at the same angle and size. Begin by drawing a horizontal line across the center of the head where the ears will be located. Then draw two diagonal lines that intersect at the center point of the horizontal line. These lines will form an X-shape that will help you position the ears symmetrically.
Next, draw the basic shape of each ear using curved lines that follow the guidelines you created. Make sure that both ears are the same size and shape, and that they are angled in the same direction. Adding details such as fur tufts or notches on the edges of the ears can make them look more realistic.
Once you have drawn both ears, take a step back and compare them to ensure they are symmetrical. If you notice any differences in size or angle, adjust accordingly until both ears match. Don’t be afraid to erase and redraw until you get it just right.
Practice Drawing Basic Shapes
Well, the secret to achieving this is by practicing drawing basic shapes.
The first step in drawing cat ears is to start with a triangle. It may seem like a simple shape, but it’s the foundation for creating symmetrical and proportional cat ears. Use a ruler to measure the size you want your ears to be, draw a triangle, and make sure it’s evenly spaced and centered.
Once you have your triangle, it’s time to add some inner ear triangles. Draw two smaller triangles inside the larger one, slightly smaller and towards the bottom of the larger triangle. This will give your cat’s ears a more realistic look, making them stand out in your artwork.
Now, it’s time to add some details. Drawing a curved line from the top of the ear down to the middle of the inner ear will add depth and dimension to your drawing. By sketching in short, thin lines around the edges of the ear, you can create fur texture that will make your cat’s ears come alive.
But don’t stop there. To take your cat ear drawing skills to the next level, you need to experiment with different styles and positions. Try drawing them at different angles or making them longer or shorter. The possibilities are endless, so keep practicing until you find your own unique style.
Reference Images Can Help with Positioning
If you’re looking to improve your cat ear drawing skills, then look no further. As an expert in the field of art, I can tell you that reference images are an invaluable tool when it comes to getting the positioning just right.
To start, it’s essential to find reference images that match the specific type of cat ears you want to draw. The internet is a great resource for finding photos and illustrations of cats and their ears. When choosing images, make sure they show the cat from different angles so that you can get a better understanding of how the ears sit on the head.
Alternatively, if you have a furry friend at home, taking your own reference photos can be especially helpful. You can capture different expressions and poses that can add a personal touch to your artwork.
With your reference images in hand, it’s time to start sketching. Use them to ensure the positioning of the ears is accurate and proportionate with the rest of the head. Don’t worry about adding too much detail yet – focus on getting the basic shape just right.
As you add more detail to your drawing, take inspiration from your reference images to help you add texture and shading to the ears. This can bring them to life and create a more realistic effect. And don’t forget about any unique markings or fur tufts your cat may have – these details can add character and personality to your artwork.
Tips for Drawing Cat Ears
Look no further. With the right tips and techniques, anyone can draw realistic and expressive cat ears. Here are five essential tips to help you get started:
Study real cat ears
To create realistic cat ears, it’s important to study real-life cat ears or photos of them. This will give you a sense of their shape, size, and placement on the cat’s head. Take note of the details such as fur texture and inner ear structure.
Start with basic shapes
Begin by sketching out a basic triangle shape for the ear, followed by adding details such as fur and folds. This will help you get a sense of the ear’s overall shape and proportion.
Pay attention to details
Cat ears have several unique features that add to their appearance, such as tufts of fur, ridges, and folds. Pay close attention to these details when drawing to make your ear look more lifelike.
Consider the angle
The angle at which you draw the ears can affect the overall mood and expression of your cat. For example, if you draw tilted or angled ears, it can indicate alertness or aggression.
Practice makes perfect
Like any skill, drawing cat ears takes practice. Don’t be discouraged if your first attempts don’t look perfect – keep practicing and refining your technique until you’re satisfied with the result.
Conclusion
In conclusion, mastering the art of drawing cat ears can be a delightful and fulfilling experience for artists of all levels. Not only are cat ears adorable, but they also have the ability to convey a wide range of emotions and expressions. To create realistic and expressive cat ears, it’s crucial to pay attention to details such as shape, size, fur texture, and inner ear structure. Additionally, the angle at which you draw the ears can significantly impact the overall mood and expression of your feline subject.
Before diving into your artistic endeavor, ensure that you have all the necessary materials on hand. High-quality pencils or pens, paper, an eraser, and reference images are essential tools for achieving success in drawing cat ears. Start by sketching out a basic triangle shape for the ear and then add intricate details such as fur texture and folds. Keeping symmetry and proportions in mind while drawing both ears is vital.
It’s important to remember that practice makes perfect when it comes to drawing cat ears. Experiment with different styles and positions until you find your own unique approach.


